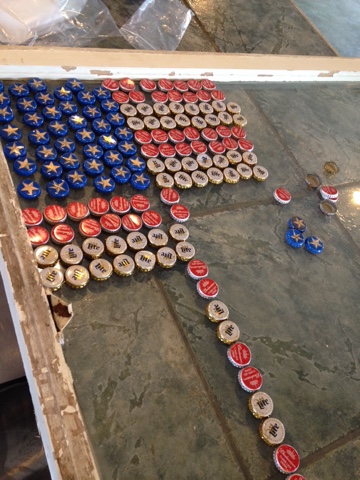
One old window frame
Beer caps sorted
Played with the lay out

Got the layout that I wanted!
All American Beer Cap Old Glory!
I found the old window at the Angleton Market Days last year and scooped her up! She is 39" X 34". I sealed the glass with E-6000 glue, because I did not want any epoxy to leak out when I started that process (been there done that on my Mardi Gras piece last year). Make sure you glue the corners, because your epoxy will try and seep out any crack it can! I tested the seals by pouring a cup of water on the window! This also gave me another opportunity to clean the glass again.
Next I started hitting a lot of the local Ice houses and Bars for beer caps (you can also find them on Ebay & Etsy if you not up for walking in bars and asking for caps). I tried to use the least bent ones I could find...and a little tip...Let them dry out in your garage, not your house! Phew they can smell for a few days!! I used Lone Star Light caps for the Stars, Coors Light caps for the filler between the stars, Budweiser caps for the red strips, Miller Lite caps for the white stripes and then I used Bud Light caps for the border around the flag. I had to play with it a lot in the beginning to see how she would lay out. I think I pulled the caps off the glass four times before I found a layout that I liked. I staggered the caps to give more room, and this also helps keep the rows straighter! I use approximately 960 beer caps. I got 13 stripes and 50 stars! I also used tin snipes to cut some caps because I could not fit a full cap on some rows, this help fill in the gaps on the Bud Light Border.
Okay...now I had the layout I wanted and took photos & made written notes so I would not forget how I placed the caps, because I was ready to start the epoxy process. I found my epoxy at Amazon, its called Easy Cast Clear Casting Epoxy & I bought the gallon mixture (you will get two half gallon bottles, one is the mix & one is the hardener. Mix half & half, and stir well). I mixed one Solo Red cup with my epoxy mixture & spread it out as even as I could before placing each cap back on the window! I used just a thin layer so the caps would sit and set. I had plenty of time (1 1/2 hours) to set the caps before the epoxy started really setting. Once I had all the caps in place I used a hair dryer (mine is a very heavy duty one that I use on golf clubs...not hair!!) to pull any bubbles out! Some people like to use a torch which is fine, but it can scorch! I let the piece dry over night before putting another layer of epoxy down. Again I used the hair dryer to pull bubbles out of the epoxy! If you get a bubble during the hardening process..not to worry..poke a hole in it and when you do your next layer it will fill in and you will not be able to see it at all!!
I am done! Three layers of epoxy (one gallon total) and I think she came out looking great! It is very heavy but that is okay!
Supplies:
Favorite clear glue or caulk
960'ish beer caps
Tin snips
One gallon clear epoxy resin
One window frame, or frame of of your choosing
One sign that says:
"Do Not Touch"
&
A little time!!


